I’ve seen many posts about making an envelope pillow cover from a single piece of fabric. What if you want a removable cover that has a different front and back? Or, what if you have an odd shape you want to add a removable cover to? Today I’m going to show you how to figure that out! It’s really just basic math, but sometimes pictures & sketches help clarify things. Adding an envelope back to a quilted top or any top will be a piece of cake! I’ll also give you some tips to give your removable cover a more professional finish.
Disclaimer: This post contains affiliate links which means I may receive a small commission if you buy something through my link or ad. This does not change your cost it just helps keep this blog running. Thanks for your support! See Privacy Policy & Affiliate Deals page for more information.

Finding the Size
The first thing we’ll do is measure the quilted top. This top measures 42″ x 16 3/4″.

Transfer these measurements to graph paper, letting each square equal 1″. I marked a line at the 21st square to represent the center of the quilted top.
Note~> If these sketches don’t make sense, I have more pictures in the next section with the fabric. Hopefully that will help!

We need to add 2″ to 3″ for the fabric to overlap. I’m using 2″, so I added 1″ to each side of the center line and marked it as a dashed line.

The ends of the fabric will need to be hemmed, so I added another 1″ to each side. The red lines represent the added 1″ and this gives me an overall length of 23″.

Now I know I need two pieces at 16 3/4″ x 23″ to have a hem & overlap.
Making the Hem
Using a see thru ruler and fabric pencil, I marked the 1″ line for the hem.

Although it might appear my fabric magically changed colors, it really didn’t! That’s just an editing error! : )

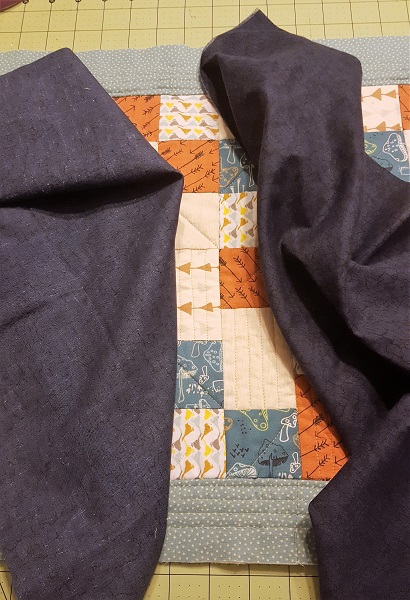
This is the picture I mentioned above. I put a length of twine on top to represent the center line. The fabric is offset so you can see the piece below. Maybe this is a better visual for some people!

I also realized at this point that I liked the back of the fabric better than the front!

Using the marked line as a guide, press the hem in place.

Now tuck the end into the crease. I like to leave a little space to keep the hem from being too bulky.

Fold it back over and stitch it down! The overlap area is where anything inserted gets removed. Adding a second line of top stitching will make this area more durable.

Now that the hem is all done, it’s time to attach it to the top.
Assembly & Finishes
Lay the hemmed pieces on top of the quilted top, right sides together. Use pins or clips to hold everything in place, especially at the overlap. Stitch down all four sides 1/2″ to 5/8″ from the edge. The larger seam will hold up better to the everyday life of a pillow or cushion! I forgot to take a picture of it all clipped together. : p
Once you’ve stitched it all together, cut across the corners & clip into the corner. This will give you a nicer finished corner.


You could turn it right side out at this point and put it to use, however, a pillow or cushion cover is removable so you can wash it. When you wash things with unfinished edges like the seams above, it will fray and eventually this can lead to holes.
To help prevent that, I’m going to finish the edges with an overcast stitch on my machine. Usually I would use my serger, but I wanted to show you how it could be done with a sewing machine. On my machine it’s stitch number 16. Most machines at least have a zigzag stitch and that will work too.
I bumped up the stitch length a couple notches because I’m sewing through several layers of fabric. Stitch down one side, lift the pressure foot, and pull out enough thread to turn the corner.

Position the next side under the presser foot and hold the extra thread off to the side before lowering the presser foot.

Why did I do this? It will keep you from cutting threads as often and make it easier to tie them off at the corners. Since you can’t back stitch with the overcast stitch, this helps keep the ends from coming undone.

Tie off the corners and turn it right side out!

Now you have a cushion/pillow cover that will last through life’s little incidents!
Y’all have a marvelous Monday and I’ll see you back here on Wednesday!


Thanks for this tutorial – the graph paper visualization and photographs are a nice way to help everyone “see” what you are describing. I only have a straight stitch machine, so I will use french seams for something like this if possible.
The french seam is a great option for this! I didn’t think of those with a straight stitch only machine, so thank you for that extra information.