 I have this headband that I love and I wear it quite frequently. Since I haven’t been able to find a one similar to it, I decided to make a new one. This will be the first crochet pattern I’ve actually written down for someone else to use. The pattern is very basic. There are only two stitches you need to know – chain and slip stitch. It’s so easy, I think I will be making many more for gifts! Does anyone else start thinking about Christmas in July? Maybe that’s just me because I make most of my gifts! This is a beginner level project, which is great for those learning crochet and an easy make for more experienced crocheters.
Disclaimer: this post contains affiliate links. See Privacy Policy for more information.
Triple Thread Headband Crochet Pattern
The yarn I used has been in my stash for a long time and I don’t remember where I got it. I tried to find something similar, but no luck! There are lots of fun yarns to choose from on Craftsy. Lion Brand’s Bonbons would be perfect for this project!

Materials
- US – F, 3.75 mm hook
- DK (3) or Sport (2) weight yarn, approximately 11 yards
- Yarn needle
- Stitch marker
Abbreviations
sl st – slip stitch
ch – chain
st – stitch
beg – beginning
Sizing
My head measurement is 23″. I made the headband to be not too snug because a) I have a lot of hair and b) tight headbands give me a headache. Take a measurement around your head like you are wearing the headband. Then decide if you need to adjust the stitches. I will note where to do that in the instructions.
Instructions
This pattern is worked in the round.
Ch 80, leaving a 3″ tail at the beg; join with sl st to beg ch – make sure your chain is not twisted before joining; count back to the right 13 st and add a stitch marker (this does not include the joining stitch)
Note:
This is where you make any adjustments. If it needs to be smaller, take out chains. If it needs to be bigger, add chains. Test fit it on your head. Make the same adjustment in stitch count where you see (adjust here). For example, if you add 5 stitches to the beginning chain count you will add 5 stitches to the areas indicated.
Round 1: Sl St in the next 12 ch, ch 60 (adjust here), sl st into marked st and the next 12 st, sl st into beg sl st

Round 2: Sl St in the next 12 sl st, ch 60 (adjust here), sl st into marked st and the next 12 sl st, sl st into beg sl st, cut thread, leaving a 3″ tail, and pull through last st

Your ends will look a little offset, but this will be fixed when you finish it off.

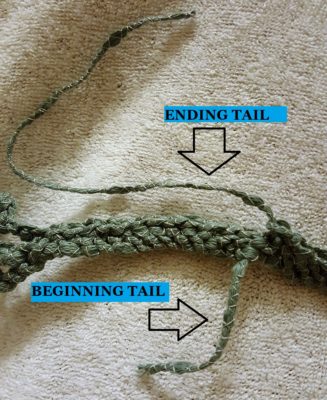
Thread the ending tail through the yarn needle. Insert the needle through the stitches to the left and pull the tail through, snugging it up to make the stitches lay flat.

Insert the needle going back to the right, catching slightly different stitches this time. Go back to the left one more time, again catching slightly different stitches. This will help lock the end of your thread.


Do the same thing, in the opposite direction, for the beginning tail. As you can see by my picture, make sure you leave enough yarn at the beginning to do this!

All finished!

Here are some pictures of the headbands “in action”!


I hope my instructions are easy to understand. If you find any problems, please let me know. Remember, this is my first written pattern for the public, so I’m sure it’s not perfect! If you’d link to print or make a pdf of this, just us the buttons at the bottom of the post.
Y’all have a wonderful Wednesday and go get creative!
All content of this site, including patterns, photos, and posts is copyright by Kristie Cook/Teadoddles unless otherwise noted. Please do not copy, sell, or redistribute patterns, rather link back to the original post. Anything made by you from patterns on this site is fine to use for gifts, charities, or to sell, again, just link back to the original post. Thanks!


I love it. It looks so fancy and all. I have the perfect yarn. Great presents for Christmas, too. My girls will love them. Hope you are doing okay. I miss your voice. Roseanne